Cherry Studio Mobile Setup: Download, Qumge Models and AutoWhisper MCP
For everyday phone use, start with AutoWhisper in your browser. No model configuration is needed. Use this guide when you want your own AI client to work with AutoWhisper.
Follow this complete flow: Download Cherry Studio → prepare AutoWhisper and Qumge accounts → configure the Qumge model → authorize AutoWhisper MCP → add MCP to your specific agent → open a new chat and verify → create and retrieve results.
The model, MCP server and agent are separate settings. A connected server is not automatically added to your agent. After adding it, start a new chat for the first check.
Prepare two accounts
- AutoWhisper: register or use your existing account. Authorize MCP with that same account to access your existing workspaces and content.
- Qumge: register and sign in, then obtain your own model API key. The model handles conversation and tool calls; AutoWhisper MCP provides workspace and content tools.
Qumge model charges and AutoWhisper generation credits are separate. An AutoWhisper account does not automatically include Qumge API quota. The regular web app does not require Qumge.
Step 1: Install Cherry Studio
Open the official mobile download page on your phone and tap your platform’s button; no second phone or QR scan is needed.
- iPhone / iPad: use App Store → Get. Requires iOS / iPadOS 17 or later. For the beta, install TestFlight and open the official invitation.
- Android: use Google Play, or select APK on the download page, open the downloaded file and follow the installer.
The official mobile release checked on 2026-11-16 was v0.5.5; store and beta availability may differ. See the official installation guide and release notes. You can skip a first-run model wizard and configure the model below.
Step 2: Get a Qumge API key
- Open qumge.com/zh on your phone or computer, sign up and sign in.
- Follow the page’s Get API key entry or open the console and create a key. It usually starts with
sk_qumge_. - Copy the key. It is usually shown only once, so copy it now; never paste it into a chat, screenshot or group.
- Top up or activate quota as the Qumge page instructs. Without available balance, model calls will fail.
This key is Qumge’s model credential. It is not your AutoWhisper password, and it is not AutoWhisper credits. Qumge is a separate product with its own bill.
If you already have a DeepSeek, Kimi, OpenAI or Gemini key, skip this step and use that provider’s address and model name below.
Step 3: Create the Qumge provider, then add one model
Provider settings and model settings are separate. Enter the key and address for the provider; enter the exact model ID in its Models tab.
- Open Settings → Model service → Add provider → Custom provider and name it
Qumge. Avoid the built-in DeepSeek template pointing atapi.deepseek.com. - Paste your own Qumge key under API key, tap Add, and confirm the key is added and enabled.
- Under API address, choose OpenAI Chat. Enter
https://qumge.com/v1as the Base URL and complete the address action. Do not append/chat/completions. This DeepSeek route does not need Anthropic, OpenAI Responses or Gemini addresses. - For a new provider, tap Continue. For an existing provider, open it and switch from Configuration to the Models tab at the top.
- Start by tapping Add for just one model; synchronizing the whole catalog is optional:
| Field | Example |
|---|---|
| Model ID | deepseek/deepseek-v4.1-flash |
| Display name | DeepSeek Flash (your choice; changes the label only) |
| Model type | Text / chat |
| API | OpenAI Chat |
Keep the deepseek/ prefix. This ID was checked on the current Qumge model page on 2026-11-16; use the current catalog for future changes. For MCP, choose a model listed with tool calling. Editing a capability flag does not give a model that capability.
deepseek/deepseek-v4.1-flash
- Tap Add, finish creating the provider and confirm it is enabled in the provider list. Start a conversation, select Qumge → DeepSeek Flash and send “Hello” to check the model connection.
If you prefer synchronizing Qumge models
Models → Sync fetches Qumge’s candidate list, which may contain hundreds of entries. Fetching does not select or add every model automatically. Search for the model you need, select only it and tap Update. Manual addition is enough for the first setup.
If the model does not reply, first check that the key was added and enabled, the Base URL is https://qumge.com/v1, the complete model ID is correct and the network works. Fix that before MCP. Model calls may use Qumge quota.
Step 4: Add AutoWhisper MCP
- In Cherry Studio, open the sidebar and go to Plugins → MCP → Custom.
- Name it
autowhisper.xyz; use this same name in the agent and first test. - Set the address to
https://autowhisper.xyz/mcp. No trailing slash. The mobile app accepts HTTP service addresses only; it cannot runnpxoruvxcommands. - If the app asks for a transport, choose HTTP / Streamable HTTP, not STDIO.
- Choose OAuth for authentication (recommended). After saving, the app opens a browser; sign in to AutoWhisper, check the requesting app and tap Approve, then return to Cherry Studio.
- When using OAuth, do not also fill an
Authorizationheader. - If your build only offers headers, use one line:
Authorization=Bearer <your API token>. See the device-code section of the mobile guide for the token. The token carries your account’s permissions; enter it only in a client you trust.
- When using OAuth, do not also fill an
- OAuth authorizes your AutoWhisper account, so you do not need to copy a separate AutoWhisper API key. Enter the Qumge key only in the model provider settings.
- Check the server status and tool list. This verifies the server connection only; your agent is not configured yet. Continue to Step 5.
Step 5: Add MCP to the agent you actually use
Configuring a custom MCP server is not enough: select it inside the specific agent. For example, edit the Cherry assistant you actually use, rather than staying on the Plugins server page.
- Open your agent’s editor, or create your own agent.
- Select Standard mode and the Qumge model configured in Step 3.
- Find the editor’s MCP section, tap Add MCP, and select the existing
autowhisper.xyzserver. - Return to the editor and confirm
autowhisper.xyzappears in that agent’s MCP list, as shown below. An empty list means it has not been selected. - Save a newly created agent. Existing-agent edits normally save automatically; confirm the server remains listed when you return.
- Open a new chat or task with that agent before testing. Do not reuse the conversation opened before configuring MCP.
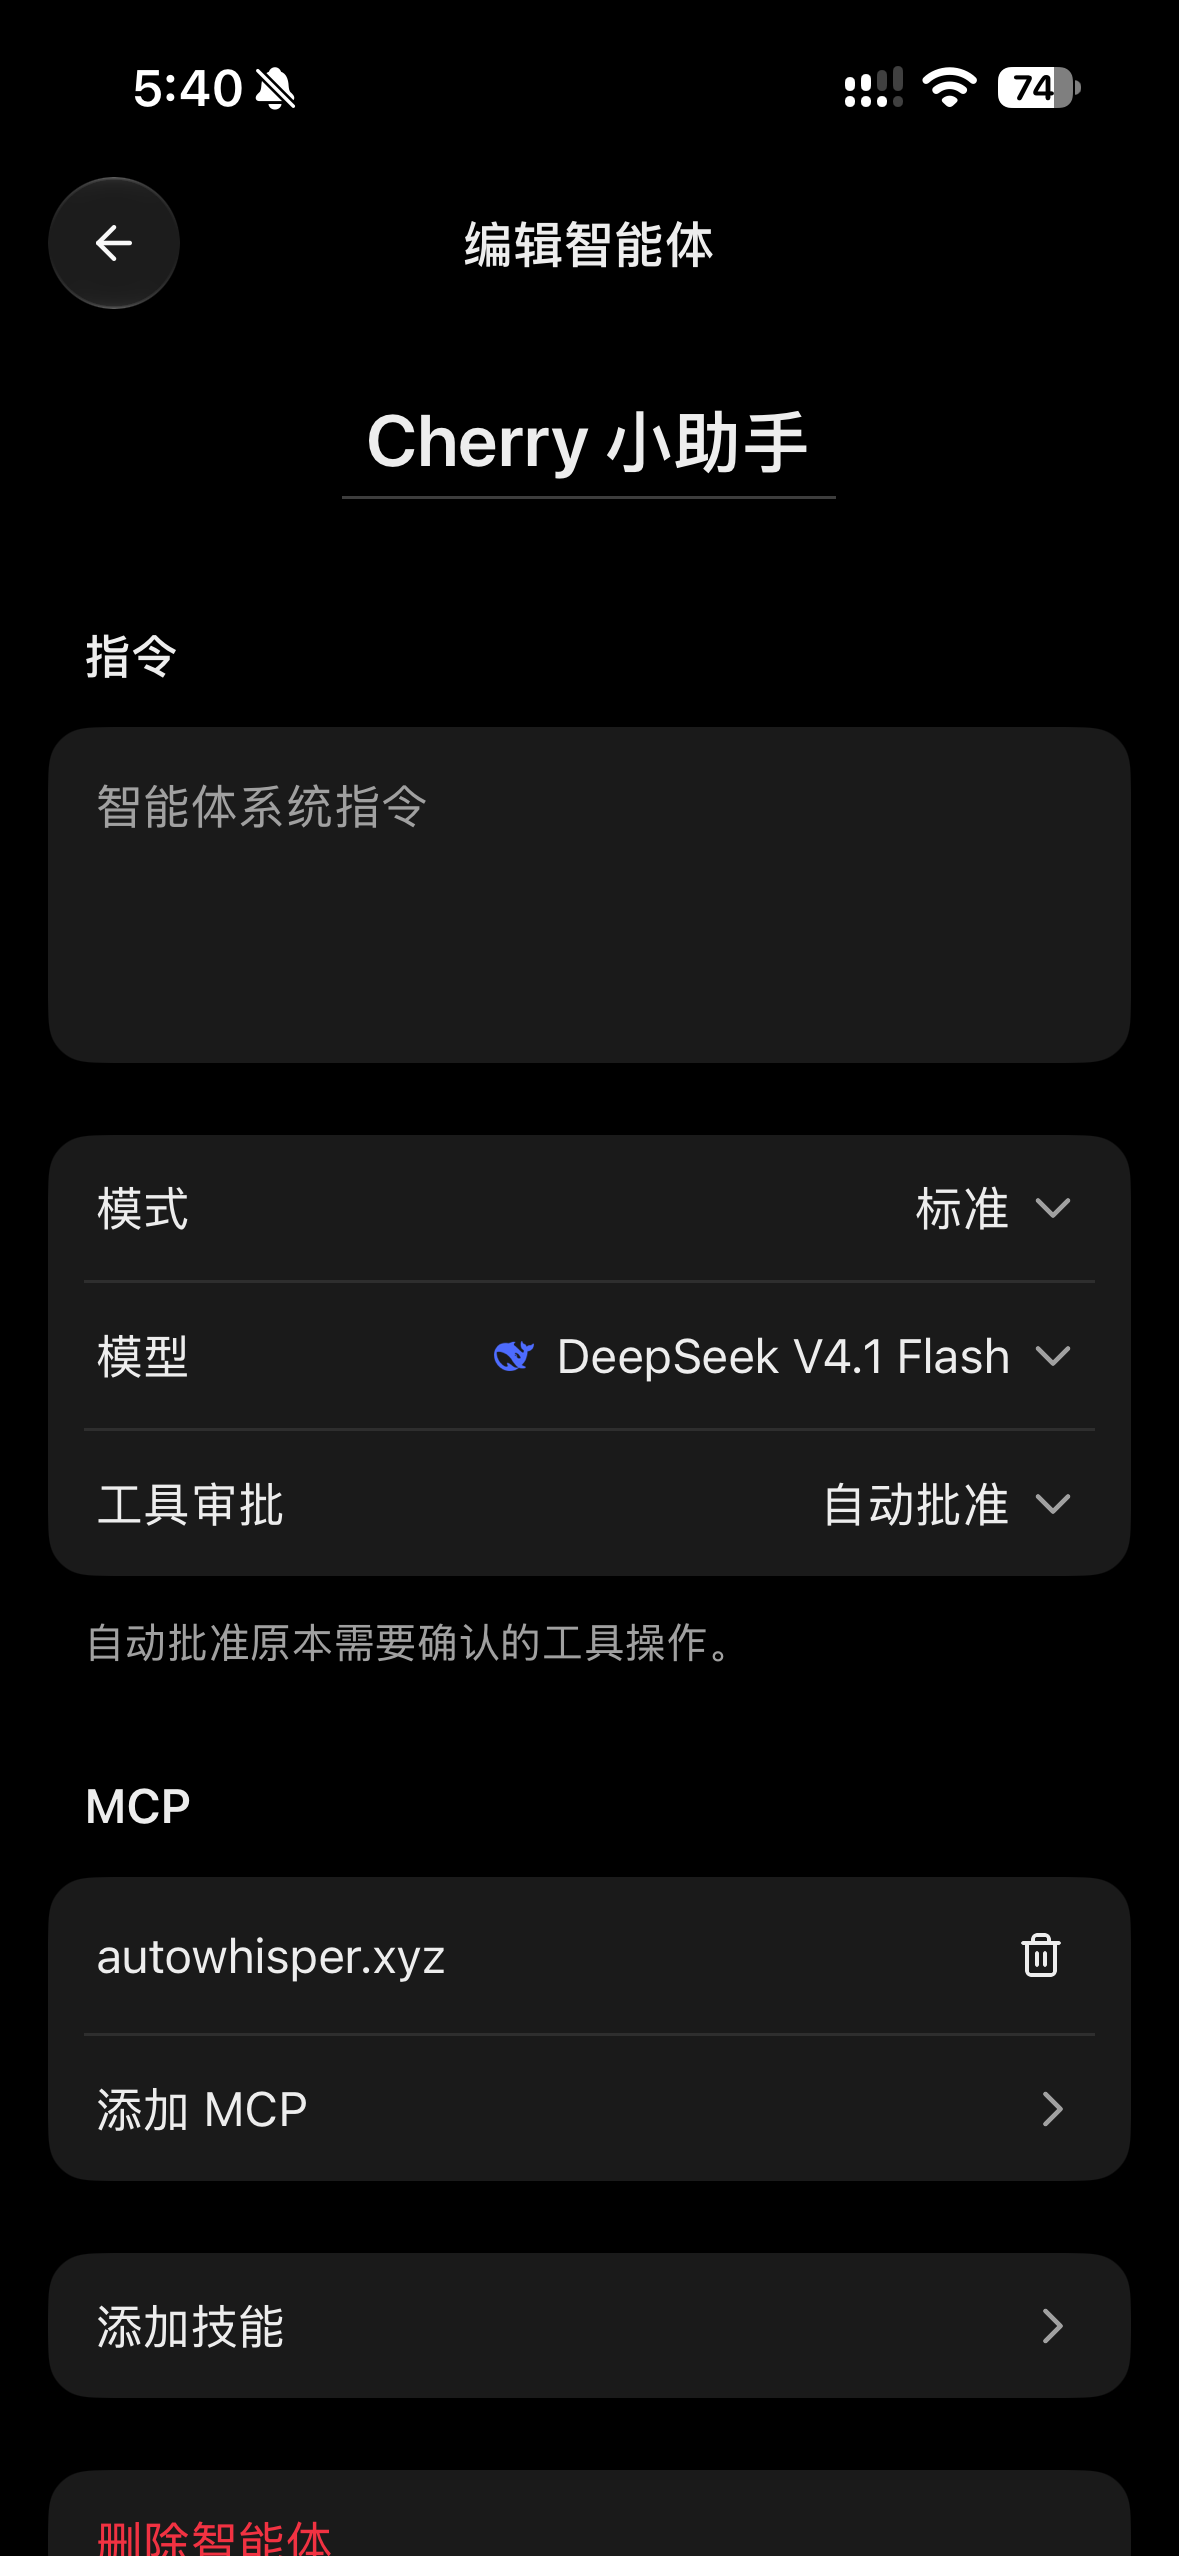
The important fields are Standard mode and autowhisper.xyz in the MCP list. Automatic approval in this screenshot is not a setup requirement. Check the MCP list again when switching to another agent.
Step 6: Verify with a read-only prompt
Open a new chat with the agent configured above. Explicitly name the connected autowhisper.xyz MCP in the first message. Read only: do not generate or publish, and do not search files or the web.
Please use the connected autowhisper.xyz MCP, call the tool that lists workspaces, and return my workspace names. Do not search the file library or the web. If the call fails, show the specific error.
Real workspace names from an actual MCP call verify the connection. If it only offers to help, searches elsewhere or says the tool is unavailable, check that this agent lists autowhisper.xyz, then open another new chat. Keep the specific error if the call fails; do not treat a failed call as an empty workspace list.
Step 7: Request content, retrieve results and revise
After the read-only check, send a request in the same agent conversation:
Pass this request to AutoWhisper CMO: make an introduction for my product. Review the product, real materials and plan first, then wait for my confirmation before production.
- Provide a product URL if available. Attachment support depends on the client; if its tools cannot read a phone upload, upload it on the AutoWhisper website and continue from there.
- Confirm production after reviewing the plan and credits. Qumge conversation charges and AutoWhisper generation charges are separate.
- Work may continue in the background. A reply or script is not the finished asset. Later, ask:
Check the status of that task. If complete, list the finished content and show the preview, content page or download links returned by the tools. Otherwise tell me its current progress.
- Images, videos and links appear according to the client’s capabilities. If downloading is unavailable in chat, open the returned content page in your phone browser, sign in to the same account and download there.
- To revise, identify the content and changes in the same conversation and ask the agent to pass them to AutoWhisper CMO. Avoid submitting a duplicate task in a new conversation.
Configuration reference
| Purpose | Value |
|---|---|
| Model provider | Custom provider, OpenAI-compatible |
| Model API address | https://qumge.com/v1 |
| Model key | Your own Qumge API key |
| Model | One from the current list that supports tool calls |
| MCP URL | https://autowhisper.xyz/mcp |
| MCP auth | OAuth: approve using your original AutoWhisper account |
Copy the model API address:
https://qumge.com/v1
Copy the MCP URL:
https://autowhisper.xyz/mcp
Troubleshooting
The model does not reply. Go back to Step 3 and send “Hello” in a plain chat. Check the key, the enable switch, the API address, the exact model ID and the network; only then look at MCP.
MCP says connected, but the agent has no tools. Check Standard mode and that agent’s MCP list. Tap Add MCP if autowhisper.xyz is missing, then open a new chat and use Step 6’s explicit MCP instruction.
401 / Unauthorized. OAuth did not finish, or the header is missing the token. Approve again. After Disconnect on the settings page, the old token is invalid immediately and you must reconnect.
The browser never returns to the app. Update Cherry Studio first; if it still fails, use the header method. OAuth callbacks require the app to support mobile callbacks.
OAuth dynamic client registration (DCR) fails. Some builds do not support DCR. Update the app; if it still fails, use headers with a device-code token.
The model list will not load. Confirm the API address is https://qumge.com/v1, the key is sk_qumge_... and the account has quota. If it still fails, enter the model ID manually with its provider prefix.
400 tools_unsupported. That model’s route cannot carry tools. Go back to Step 3 and pick a model that appears under the tool filter on Qumge’s model page (or one whose /v1/models entry has capabilities.tools). Qumge rejects the call before charging, so there is no charge.
SSE or Streamable HTTP? Choose Streamable HTTP. The Cherry Studio mobile app accepts HTTP services only; if it offers SSE alone, switch to Kelivo or RikkaHub.
Trailing slash? No. Use exactly https://autowhisper.xyz/mcp.
The UI does not match this guide. Cherry Studio Mobile is beta and its labels change. Follow the two key paths — Sidebar → Plugins → MCP → Custom and the Standard-mode agent’s Tools / MCP — and treat the app’s own UI as the source of truth.
Start now
Open Settings → Connect your agent, copy https://autowhisper.xyz/mcp, and configure it in the order above. Run the read-only check before letting it make content.
For choosing another mobile client (Kelivo, RikkaHub, Manus), read Connect AutoWhisper from Your Phone. For everyday use, tap 开始使用 (Start using) in the WeChat official account and follow the phone browser guide.
Official mobile references: providers and models, mobile releases. Use the features available in your installed build and selected model; the setup does not depend on a particular free model.